

I’ve wanted to put up a reasonably priced gallery wall of same size frames in this spot for over a year now. The attention deficit part of me just couldn’t make it happen because it was too many steps. If I could just buy one large piece of artwork and hang it up that would be SO much easier BUT I really love some of the photos I had from beach trips we’ve taken and so couldn’t pass on a gallery wall.
As with any project that I’m procrastinating, I had to break it down into more manageable less time-consuming steps for myself to be able to move forward and actually make it happen. If you are in the same boat, or even if you want to do it all at once, follow the steps below.
Supplies Needed for DIY Gallery Wall
If you don’t have the following tools on hand, find someone to borrow them from or purchase:
- Hammer
- Electric screwdriver (if your frames will be heavy and/or you plan to use screws instead of nails to hang your frames)
- Level
- Step ladder or stool if you can’t reach the top of your gallery
- Nails, screws or other picture hangers (if your frames don’t come with them)
- Wall putty
Steps to Create Your DIY Gallery Wall
Let’s do this!
Step One: Decide what types of art you want in the frames. Is it family photos? Vacation photos like me? Paintings? Etsy prints? Children’s artwork?
Step Two: Select your photos/prints. I created an album on my phone and just added the photos I wanted to consider for this project. You could also do this on your computer or create a Pinterest board of etsy prints you want to consider. I just added anything I wanted to consider to the album and then narrowed them down later.
Step Three: Choose the number of frames you want to use and make sure you have enough photos/prints.
Step Four: Choose the sizing and orientation you want. Decide if you like square or portrait or landscape. When looking at the photos in my album, I decided that the majority would fit in a square shaped frame and that’s how I made my decision. You may find that yours are mostly taken in portrait or landscape orientation, this is an easy way to narrow down what photos/prints you will use.
Step Five: Find your frames. If cost is not an issue, shops like Shutterfly and mpix will print and frame your print for you. Mixtiles does this too but when I was shopping around, their sizing was only 8×8 and I was going for something bigger. If you choose this easier route, skip to step 9. If you can’t swallow that price like me, follow along. If you search gallery frames, you can often find sets of frames at a discounted price versus buying each one individually.
I used this set of frames available on Amazon in black or white:
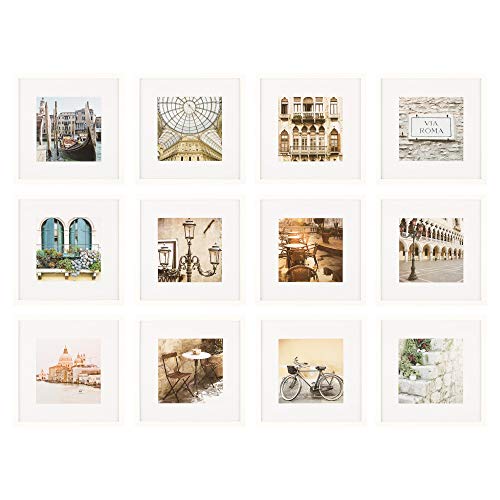
I was happy with the value and the 12×12 frames with 8×8 openings were a good size for my project.

Step Six: Order your prints: Narrow down your photo choices to the number of frames you purchased. I ordered a few extra as I couldn’t narrow my photos down to just twelve and thought it would be easier to narrow down with physical copies. I can always use the extras in other areas of my home. Before uploading them to the photo print site, I used the Adobe Lightroom free photo editing app to adjust the lighting so that they all would have similar lighting and tones. I used mpix to order my square prints and found them to be of great quality. My total for 12 8×8 prints plus a few extras came to $36 with shipping.
Step Seven: It’s an exciting day when your prints arrive! If you ordered extra prints like I did, lay them all out to see how they look together and eliminate the ones you will not include in your gallery. It’s easier if you step back from them and take note of any that don’t fit with the color scheme or are much darker or lighter than the others. It’s a quick game of which one doesn’t belong.
Step Eight: Add the photos/prints to your frames. Don’t forget to pay attention to which way they will hang so you don’t end up with an upside down print once it’s hung.
Step Nine: If you bought a gallery set like I did, it comes with a template to hang on the wall. Decide where on the wall you want it to hang and mark the center of where you want your gallery to hang. I wanted mine to be centered on the wall so measured my entire wall and marked the center. Center the template with your mark and hang it on the wall using painters tape or tacks with a level and step back and take a look. Adjust as needed but make SURE it is level before proceeding. If yours did not come with a template, you can cut out copy paper to match the size of your frames, mark them with where the nail or screw will hit the frame and hang them on the wall starting with the center and going out equal distances to each side and down with a level.

Step Ten: Either pound nails or screw in screws right through the template where indicated on your template. My set came with screws and since I was using a power screwdriver to put the screws in, I was nervous this would rip my template off the wall so I just poked holes through the template with a screw (you could also use a pen which would make it easier to find the marks on the wall!) If you get the same set that I used, I would recommend using nails instead of the included screws as they would be easier to attach the frames to and do less damage to walls from the holes.
Step Eleven: Lay the frames out on a table or the floor in the shape they will go on the wall and rearrange until you are happy with how they look. It’s much easier to rearrange the order on the floor versus when they’re hanging on your wall. I tried to make sure I didn’t put any that looked similar right next to each other, instead I spread them out to balance the overall look.

Step Twelve: You’re almost there! Now just hang the frames on the wall in the order you laid them out.

Step Thirteen: If you’re happy with everything and it is all perfectly level, great! Most likely you will need to make some minor adjustments. I had one that was quite a bit lower than the others in the row so used my hammer to pound the screw up a bit which fixed the problem. If frames are just a little bit off, move onto the next step.
Step Fourteen: Add wall putty on two to four corners of each frame (it’s best not to put your ball of putty too close to the outside edge where it will be visible when you press the frame against the wall.) Make sure the frame is level and then press the frame into place on the wall. The putty will ensure the frames stay perfectly level and aligned when doors slam or kids jump around. Trust me, they have a habit of moving out of place.
Now step back and enjoy your new personalized gallery wall! You did it! Comment below and let us know how it went or if you have any questions through the process!
Click the Pinterest link on the photo below to pin this post:

When I initially commented I seem to have clicked on the
-Notify me when new comments are added- checkbox and from now on whenever a comment is added I receive four emails with
the same comment. Is there an easy method you can remove me from
that service? Thank you!
It’s going to be ending of mine day, except before end I
am reading this fantastic article to increase my knowledge.
This DIY gallery wall guide is fantastic—so detailed and practical! I love how you broke down each step to make it manageable. The tip about using a template and laying out the frames on the floor first is especially helpful. Can’t wait to try this myself; it seems like a great way to showcase cherished photos. Thanks for the inspiration and the clear instructions!
Thank you Tammy! So glad it was helpful 🙂 If you think of it, send us a photo or tag us in a photo of your finished gallery wall. We would love to see how it turned out!! -Denay